


EP03: DevOps Capstone Project —Creating Automated CI/CD Pipeline for Pushing Images to DockerHub

In the previous episode, we containerized our QR code application, building a strong foundation for a simplified deployment. Now, let’s take it a step further by setting up a CI/CD pipeline using GitHub Actions. This pipeline will automate the testing, building, and pushing of Docker images to DockerHub every time changes are made to the main branch.
What is a CI/CD Pipeline?
Before we dive into implementation, it’s crucial to understand what a CI/CD pipeline is and how it optimizes the software development lifecycle.
A CI/CD pipeline is an automated workflow in software development that combines two core practices:
Continuous Integration (CI): Developers frequently merge code changes into a shared repository. Automated builds and tests are then run to ensure new code doesn’t disrupt existing functionality.
Continuous Deployment (CD): Code changes are automatically released to users through a series of deployment steps, allowing for frequent, reliable updates.
Together, these practices form a CI/CD pipeline, streamlining the process from code integration to deployment.

Fig[1]: CI/CD Pipeline
How Does a CI/CD Pipeline Work?
Once configured, a CI/CD pipeline operates automatically on a remote server that continuously monitors the code repository for updates. When changes are detected, the pipeline initiates and executes defined tasks like building, testing, and deploying without requiring manual intervention.
Benefits of a CI/CD Pipeline
A CI/CD pipeline provides several key advantages that help teams work more efficiently:
Boosts Developer Productivity: Developers can focus on writing code while the pipeline manages testing and deployment.
Quickly Delivers New Features: Automated build, test, and deploy steps ensure that the latest features are made available to users as soon as they’re ready.
Finds Bugs Early: Automated tests run whenever code is updated, helping to catch issues before they impact the final product.
Keeps the Codebase Stable: By attaching CI tasks to pull requests, the pipeline prevents broken code from reaching the main branch, saving developers from future issues.
Removes the Need for Dedicated Build Machines: The CI/CD server takes care of all build and deployment steps, so there’s no need for separate machines to handle these tasks.
Overall, a CI/CD pipeline allows for faster, safer software releases by automating repetitive tasks and ensuring code quality every step of the way.
GitHub Actions - The CI/CD Platform
GitHub Actions provides a CI/CD solution integrated directly into GitHub. With GitHub Actions, you can set up workflows for CI/CD, automate tasks such as building, testing, and deploying code, and easily manage these processes without additional tools. While there are other CI/CD tools like Jenkins and CircleCI, GitHub Actions offers the benefit of a seamless setup within the GitHub ecosystem.
Key Components of GitHub Actions
Workflows: Custom automation processes triggered by events like code pushes or pull requests.
Jobs: Units of tasks within a workflow that run in parallel or sequentially.
Steps: Individual commands in a job, which can use scripts or pre-built actions.
Actions: Reusable code modules, with a marketplace full of actions to plug into your workflows.


Fig[2]: Github Actions Working
Setting Up the CI/CD Pipeline with GitHub Actions
Now that you understand the essentials of GitHub Actions, let’s set up our CI/CD pipeline. We’ll implement a pipeline to automate testing, building, and pushing Docker images to DockerHub on any change to the main branch.
First, set up your GitHub Actions workflow folder inside the qr-code-app repo:
mkdir -p .github/workflowsCreate cicd.yaml inside the workflows folder and add the following code:
Step 1: Define the workflow trigger
The pipeline is triggered every time there’s a push to the main branch, but with a few exceptions. We don’t want to waste time building and deploying when we only update documentation or configuration files. By ignoring changes in specific folders (like helm or kubernetes) and files (like README.md), we keep the process focused on what really matters.
on:
  push:
    branches:
      - main
    paths-ignore:
      - 'helm/**'
      - 'kubernetes/**'
      - 'opentofu/**'
      - 'README.md'
Step 2: Building and Testing the FastAPI Application
This job sets up the environment, installs Python dependencies, and runs the tests for the FastAPI backend.
jobs:
  build-and-test-fastapi:
    runs-on: ubuntu-latest
    defaults:
      run:
        working-directory: ./api

    steps:
      - name: Checkout repository
        uses: actions/checkout@v4

      - name: Setup Python
        uses: actions/setup-python@v5
        with:
          python-version: '3.11'

      - name: Install dependencies
        run: |
          python -m pip install --upgrade pip
          pip install -r requirements.txt
What’s Happening Here:
Checkout repository: Pulls the latest code so we’re working with the newest version.
Setup Python: Sets up Python 3.11.
Install dependencies: Updates
pipand installs any libraries our app needs, as listed inrequirements.txt.
Step 3: Building and Testing the Next.js Frontend
Next, we do the same thing for the frontend, which is built with Next.js. This step installs the required Node.js version and dependencies so we can test and build the frontend.
  build-and-test-front-end-nextjs:
    runs-on: ubuntu-latest
    defaults:
      run:
        working-directory: ./front-end-nextjs

    steps:
      - name: Checkout repository
        uses: actions/checkout@v4

      - name: Setup Node.js
        uses: actions/setup-node@v4
        with:
          node-version: '20'

      - name: Install Dependencies
        run: npm ci
What’s Happening Here:
Setup Node.js: Prepares Node.js version 20 for our frontend.
Install Dependencies: Runs
npm cito install exact versions of dependencies. This ensures consistent builds, which is crucial in CI environments.
Step 4: Building and Pushing Docker Images
Once both the backend and frontend are tested, we’re ready to build Docker images and push them to DockerHub. Each image is tagged with the unique commit SHA, so we can trace every image back to the exact version of the code that generated it.
  build-and-push-images:
    needs: [build-and-test-fastapi, build-and-test-front-end-nextjs]
    runs-on: ubuntu-latest

    steps:
      - name: Checkout repository
        uses: actions/checkout@v4

      - name: Set up Docker Buildx
        uses: docker/setup-buildx-action@v3

      - name: Login to DockerHub
        uses: docker/login-action@v3
        with:
          username: ${{ secrets.DOCKERHUB_USERNAME }}
          password: ${{ secrets.DOCKERHUB_TOKEN }}

      - name: Build and Push FastAPI image
        uses: docker/build-push-action@v5
        with:
          context: ./api
          file: ./api/Dockerfile
          push: true
          tags: ${{ secrets.DOCKERHUB_USERNAME }}/qr-api:${{ github.sha }}

      - name: Build and Push Next.js image
        uses: docker/build-push-action@v5
        with:
          context: ./front-end-nextjs
          file: ./front-end-nextjs/Dockerfile
          push: true
          tags: ${{ secrets.DOCKERHUB_USERNAME }}/qr-frontend:${{ github.sha }}
What’s Happening Here:
Set up Docker Buildx: Allows Docker to build multi-platform images.
Login to DockerHub: Authenticates to DockerHub using secure credentials stored in GitHub Secrets.
Build and Push Images: Builds and pushes Docker images for both FastAPI and Next.js apps. Each image is tagged with the commit SHA, giving us traceability for each deployment.
Step 4: Setting up Environment Secrets for Dockerhub
Go to your repo's Settings > Secrets and Variables > Actions.
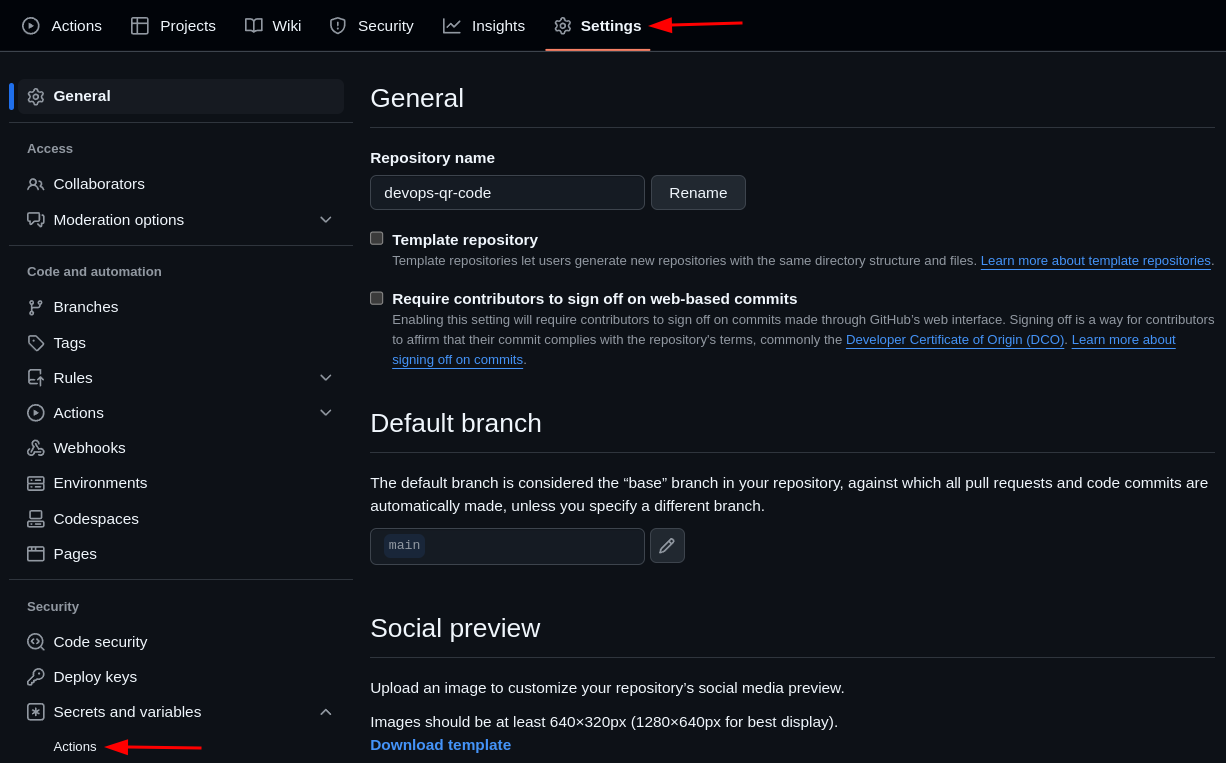
Add the following secrets in the
New repository secret:DOCKERHUB_USERNAME: Your DockerHub username.

DOCKERHUB_TOKEN: Your DockerHub Personal Access Token.

TOKEN: Your GitHub Personal Access Token.

Once you've added these secrets, the pipeline will be able to securely authenticate with DockerHub and GitHub, allowing it to push the built Docker images automatically.


Step 5: Commit and run workflow
With the workflow steps ready, you can now commit your changes to your repository.
If everything went well, you should see your workflow running:
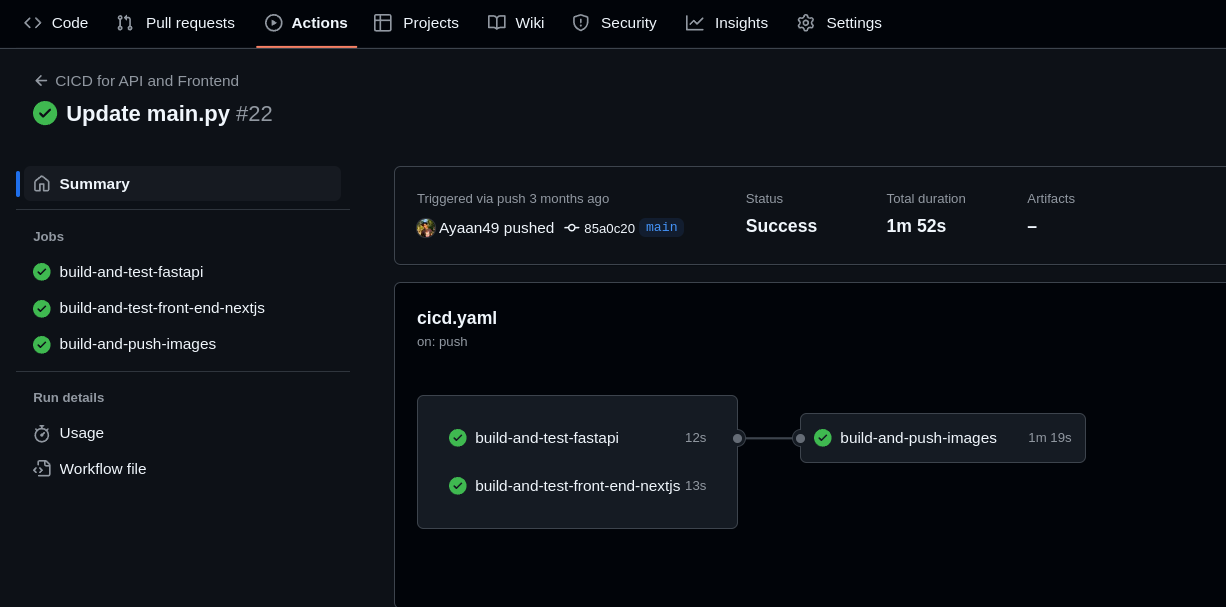
You now have a fully automated CI/CD pipeline that builds the QR application as a Docker image and pushes it to DockerHub every time you push code to your repository.
Wrapping Up!
In this guide, we implemented a CI/CD pipeline to automate the process of testing, building, and deploying our FastAPI backend and Next.js frontend. By integrating Docker, GitHub Actions, and DockerHub, we optimized our workflow for consistent, reliable builds.
In the next episode, we’ll prepare our infrastructure for cloud deployment by setting up OpenTofu and AWS CLI to provision a cluster on AWS.
Stay tuned for the next step in your DevOps journey!