

The /etc/fstab file is a vital component in Linux, storing essential information about the filesystems, their mount points, and mounting options. This file allows the system to know which filesystems to mount and how to handle each on startup. In this guide, we’ll break down the structure of /etc/fstab, explaining each field and its role, so you can confidently configure static filesystem information.
The Purpose of /etc/fstab
The /etc/fstab file serves as a reference for programs, telling them how to handle filesystems on the system. Programs like mount, umount, and fsck use this file to determine specific mount points, options, and settings for each filesystem. For example, when the system boots, mount reads /etc/fstab and mounts filesystems as specified. If you run mount -a manually, it re-reads /etc/fstab and attempts to mount any filesystems listed there. Similarly, fsck, the filesystem check tool, refers to /etc/fstab to identify filesystems that need verification on boot, helping maintain filesystem integrity.
Each line in /etc/fstab describes a filesystem and specifies details about its mount point, mount options, and other settings. For instance, an entry like:
/dev/sda1 /data ext4 defaults 0 2tells mount to mount /dev/sda1 to /data as an ext4 filesystem with default options (such as read/write access) every time the system boots.
Here is what the /etc/fstab file looks like:

Breaking Down /etc/fstab Fields
Each entry in /etc/fstab has six fields, each with a specific purpose. Let’s walk through each field and understand what it does.
Field 1: File System
The first field specifies the block device to be mounted, usually referenced by its path in /dev. For example, to specify the first partition on an sda device, you would use /dev/sda1.
You can also reference a block device by its LABEL or UUID (Universal Unique Identifier). Using UUID is preferred because it uniquely identifies a filesystem regardless of hardware changes. On systems with GPT-partitioned disks, you can even use PARTUUID or PARTLABEL for added specificity.
To gather information about a device, use the lsblk command. For example:
$ lsblk -d -fs /dev/sda1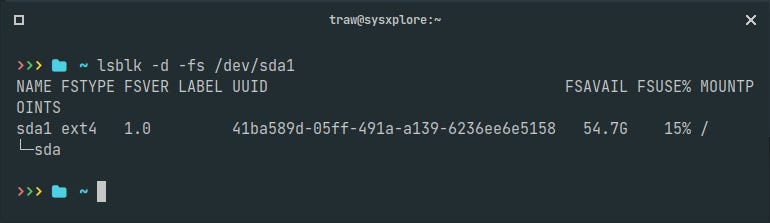
This command shows details like filesystem type, label, UUID, and mount point. Here’s a sample output:
With this information, we can use the UUID to reference the filesystem in /etc/fstab:
UUID=41ba589d-05ff-491a-a139-6236eee6e5158You can also show gather information about a specific device using the blkid command.
$ blkid
Field 2: Mount Point
The second field specifies the directory where the filesystem will be mounted, making its contents accessible. This field must contain a valid mount point path unless the device is used as swap, in which case the field should contain none.
For example, if we want to mount our filesystem at /mnt/data, our /etc/fstab entry would start as follows:
UUID=41ba589d-05ff-491a-a139-6236eee6e5158 /mnt/dataField 3: Filesystem Type
The third field identifies the filesystem type, such as ext4, or swap or xfs. It ensures that the system knows how to interact with the specified device. For remote filesystems, you would use cifs (for Samba shares) or nfs (for NFS shares). In our example, sda1 is formatted as ext4, so our entry looks like this:
UUID=41ba589d-05ff-491a-a139-6236eee6e5158 /mnt/data ext4Field 4: Mount Options
The fourth field defines mount options, which determine how the filesystem behaves. To use the default options, simply enter defaults. Here’s what “default” includes:
rw: Allows reading and writing.suid: Enables setuid and setgid bits.dev: Interprets character and block devices.exec: Permits executing binaries.auto: Mounts automatically whenmount -ais run.nouser: Restricts mounting by non-root users.async: Enables asynchronous I/O operations.
In addition to the default options, you can set extra options to customize filesystem behavior:
usrquota: Enables user disk quotas, allowing limits on disk space or file numbers for individual users.
grpquota: Enables group disk quotas, setting limits for groups rather than individual users.
relatime: Updates access times on files only when modified, reducing disk writes compared to
atime.sync: Forces synchronous I/O operations, meaning changes are immediately written to disk rather than cached. This can improve data integrity but may impact performance.
This list covers common options, but it is not exhaustive. For a complete list and further details, check the mount(8) man page by running:
$ man 8 mountWith these options, our entry now reads:
UUID=41ba589d-05ff-491a-a139-6236eee6e5158 /mnt/data ext4 defaultsField 5: Enabling Dump
The fifth field, either 0 or 1, indicates whether the filesystem should be included in backups made by the dump utility. If dump is not used, this field is usually set to 0:
UUID=41ba589d-05ff-491a-a139-6236eee6e5158 /mnt/data ext4 defaults 0Field 6: Filesystem Check Order (fsck)
The sixth field controls the order in which fsck (filesystem check) checks filesystems during boot. The root filesystem should have a value of 1, while all others typically use 2. If a filesystem does not need checking, this field is set to 0:
UUID=41ba589d-05ff-491a-a139-6236eee6e5158 /mnt/data ext4 defaults 0 2Wrapping Up
In this guide, we discussed the role of the /etc/fstab file in managing Linux filesystems, covering each of its six fields and what they control from filesystem identifiers and mount points to mount options and check settings. We also explored default and additional mount options that can be customized for your needs.